here are some samples of photoshop works......if u want to make your photo just send it to us and we will do the rest

 Do u wanna make a unique & fantastic facebook/myspace photo profile??
Do u want to have a pic and posters like stars??
Do u want to have a lovely pic with ur boy/girl friend??
Do u want to have a scary look??
Do u want to have a lot of fans and be famous ... Ur incredible look can allow u to have this.
All of this and more with us and ….
The easiest way to avoid underexposed photos is to adjust your aperture settings, your shutter speed and your film speed when shooting. That's sounds pretty easy, right? Forget it. Photoshop was invented for the "I-can't-find-time-to-read-the-manual" photographer. Who cares if it's too dark or too light, we've got Photoshop!
So how easy is it to fix an underexposed photo? Very easy. Open your photo up and choose Image> Adjustments> Shadow/Highlight (CS-only. For pre-CS look below). You'll see an immediate change in your photo and it will probably be too extreme, but don't panic. Photoshop ships with defaults that are often way over the top. Just play with the Amount Slider and the Tonal Width Slider until you find just the right balance. And you're done!

The above photo is underexposed. The chocolate strawberries look like chestnuts. Below is the same photo after applying the Shadow/Highlight filter.

Fixing Underexposed Photos, Pre-CS — The Layer Sandwich Trick
If you don't have CS, then the following trick will help you achieve similar results. I actually find this method produces better results.

Step 1 — New Layer
Open your photo and make a copy of the Background Layer by choosing Layer> Duplicate Layer, or by dragging it to the New Layer Icon at the bottom of the Layers palette.
Step 2 — Change The Blend Mode
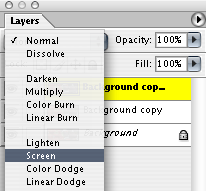
In the Layers palette change the Blend Mode of the new layer from Normal to Screen. This will lighten the photo uniformly.
Step 3 — Repeat
Now repeat the entire procedure again. Create a new layer, change the blend mode to screen, and then take a look at the result. Continue doing this until you go from "oh-my-god it's almost perfect" to "oh-my-god I've ruined it!"
Step 4 — Lower The Opacity
Now leave that last layer active even though it's taken you too far and lower the Opacity using the slider at the top right of the layers palette. This lowers the intensity of the effect. When you've found the right amount, you can flatten your image.
Step 5 — Flatten And Save
Choose Layer> Flatten or use the palette’s flyout menu and choose Flatten Image. That's it. Save your file (File> Save) and you're done.

taken from:Jennifer Apple
If you want to take some text and wrap it around an object there are some complicated procedures using the Shear filter that will yield very precise results, but for most uses the following quick and easy technique will produce the desired effect.

To begin open your image and create a new layer by going Layer> New> Layer.
On this layer you will place the type by choosing a font and typing the words of the phrase you want to wrap. I've found that handwriting fonts work the best.
To select a font in Photoshop go Window> Character. In the palette you'll see a list of your installed fonts. Make sure to tweak the settings so that the spacing and size and color are all appropriate for the effect you want to achieve.

Bend That Text
Make sure that your text layer is active and then go Layer> Type> Warp Text.
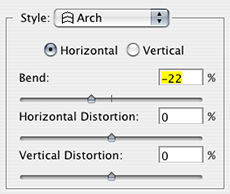
Now you need to choose a transform option from the Style popup menu. Choose Arch and then click Horizontal.
The Arch Style's default is to bend from left to top to right, but we want to bend from left to bottom to right, so we need to move the Bend Slider toward the left until we reach a negative number.
I found -22 to be very close to the shape of the curve of the cup's lip, so that worked for me. Readjust the slider until you feel you've got it just right. And that's it! Click OK.
A Couple Of Little Tweaks
One thing that can help is to use the move tool (keyboard shortcut V) and very carefully move your type to reposition it in a more natural looking way. You might also find that you want to rotate the warped text. Go Edit> Transform> Rotate. You'll now see a bounding box. With your cursor outside of the bounding box, click and move your mouse to rotate the text. To accept the changes double-click inside the bounding box, or to cancel hit Esc. If you make a change but then decide against it, choose Edit> Undo.
taken from:Jennifer Apple

 Do u wanna make a unique & fantastic facebook/myspace photo profile??


