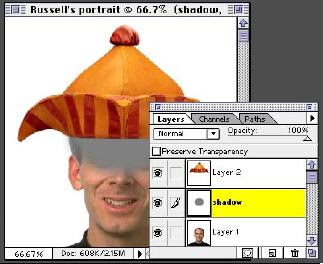
DISPLACE SHADOWS WITH PHOTOSHOP
1. In Photoshop, open up the image on which you would like to create the displaced shadow. Here we want to put a hat on this incredibly good looking face and give it a realistic shadow. To start, we want to create a new image file using this image.
Shortcuts
Throughout this document, “Command/ Ctrl” means Command on the Macintosh® and Ctrl on Windows.®“ Option/Alt” means Option on the Macintosh and Alt on Windows.

2. Go to the Channels palette. Toggle through the three channels by pressing Command/Ctrl + 1 = Red Command/Ctrl + 2 =Green Command/Ctrl + 3 = Blue Find the one channel with the most contrast. In our case it was the red channel. With the channel selected, choose Duplicate Channel.

3. In the dialog box you will want to choose “New” under Document. Then in the Name field type in “Blur map”. Note: if you are on Windows you must give it the .psd extension.

4. You should now have a new image with the file name Blur map open on your desktop.
Notice: if you check its channels, it has only one channel
This is important because we only want to displace our shadow vertically. In order to have true horizontal displacement there must be a second channel.
Displacement map
Is basically a second A Displacement map image that the Displacement filter uses to determine how
to distort the selection. Any Photoshop file except bitmaps can be used.

5. Now we want to smooth out the gradations in this image and have detail without any speckling. The best way to do this is to choose Filter > Noise > Despeckle. Repeat filter three to four times. (Command/Ctrl + F) The softer and smoother the displacement map, the smoother the shadow effect. Once you have done this, save the image and put it aside.

6. Let’s go back to our original image. Get back in RGB composite mode. (Command/Ctrl +~) Next, open the image that you want the shadow to fall under. In this case, we want to have a realistic shadow falling under the brim of this hat. Ahha, now it’s starting to make sense! Notice that our hat already has a transparent background.

7. Bring in the second image either by copying and pasting or dragging and dropping. Size it using the transform tool (Command/Ctrl + T). Place it into final position. You’ll want to do this in order to see where the shadow needs to fall.
Transform!
To bring up the dialog box for the Transform tool, try the shortcut Shift + Command/Ctrl + T.

8. Now, we want to create our shadow. Select the bottom layer and click the new layer icon. This will create a new layer between the hat and our face for the shadow. With this layer still selected, create an approximate shadow using one of the selection tools. (Remember, the exact shaping will be done with the Displacement filter). Fill your selection with 50% gray. Deselect, and choose Filter > Blur > Gaussian blur to create a soft shadow.
Shadows
Another quick way to create a soft shadow is make your selection then choose Select > Feather. Type in a pixel value for the selection edges to be feathered.

9. With the shadow layer still selected choose Filter > Distort> Displace. Enter 0 in the Horizontal scale and approximately30 in the Vertical scale. (Although you may want to
experiment with the amount.) The rest of the settings can stay the same. Click OK.
Displacement Filter
Remember, the image we’re using for our displacement map has only one channel. Through experimentation, we have found that only the vertical scale is needed for a good-looking shadow.

10. Next, a dialog box appears asking for a file to use for the displacement map. Navigate to where you saved the Blur map file and select it. Click OK and wait for the results. Wow! The shadow magically bends over the contour of this perfect face. Ahaa.

11. Now, to make it a little more realistic, set the mode to Multiply. Looks OK, but we can do better than this!
Multiply Mode
Effectively like sandwiching two negatives together, this mode looks at the color information in the channels and multiplies the base color by the blend color, darkening the color underneath it.

12. For the final touch we want to add a bit of warmth and color to the shadow as there would be in real life. Fortunately, Photoshop 4.0 Adjustment layers make this a snap. Choose New Adjustment Layer from the layers pop-up menu. Choose Hue/Saturation and make sure to select “Group with Previous Layer.” This way the adjustment layer will affect only the shadow layer.

13. In the
Colorize
You can use this effect to colorize black-and white images or to create a monotone effect. Your selected image will be converted to shades of red. You can then adjust the color using the

14. Voila! There you have it! The perfectly shaped and shaded shadow. For a finishing touch to make the hat appear as though it were sitting on the head, we added a single 50% brushstroke to the shadow layer underneath the hat.
references:Adobe Seminars Web Page Design
by Lisa Lopuck and Sheryl Hampton


0 comments:
Post a Comment